In the previous post we discussed the features and our impressions of this DNP Metallic consumable. If you have decided to buy this material or want to know more about how to use it, I think there are two things you really need to know before using it. Firstly, we recommend using the profile supplied by DNP: as I mentioned in the previous post, the paper is not white but metallic grey, so if we print as we normally do, we will probably notice that the colours lack intensity. To correct this, we apply a print profile specific to this paper. Secondly, you need to know that if we are not extremely careful, we may run out of paper without having used all the copies stated on the box, so be sure to read this section too.
With other types of equipment (inkjet printers, plotters…) we are more used to changing colour profiles for each paper we use (matte, glossy, lustre, heavier or lighter weight…), but with these printers, where printing is so quick and fluid, all this may seem a bit laborious. However, once you get the hang of it, it takes only a matter of seconds. I fully understand that if you have never dealt with these topics, it may seem like a bit of a chore at first, but I think in this case it is essential to know, and that is the purpose of this post.
These are the topics we will cover; select the one that interests you:
- APPLYING THE DNP METALLIC COLOUR PROFILE WITH A DNP SL620 / SL620II KIOSK
- APPLYING THE DNP METALLIC COLOUR PROFILE WITH WINDOWS
- MANAGING THE PAPER OF THE METALLIC CONSUMABLE: LOADING WITHOUT INITIAL CUTS
_________________________________________________________________
APPLYING THE DNP METALLIC COLOUR PROFILE WITH A DNP SL620 / SL620II KIOSK
To apply the DNP Metallic colour profile with a DNP kiosk, follow these steps:
- Download the DNP profile for the LX Metallic consumable and save it, e.g. on a USB stick: DS620_Metallic_Ultra
- Connect this USB stick, e.g. to the front USB port of the DNP kiosk
- Next, we will enter the kiosk settings section. (Note: If you don’t remember how to enter the kiosk’s “administrator” section to access “settings”, click HERE)
- Select “Settings”
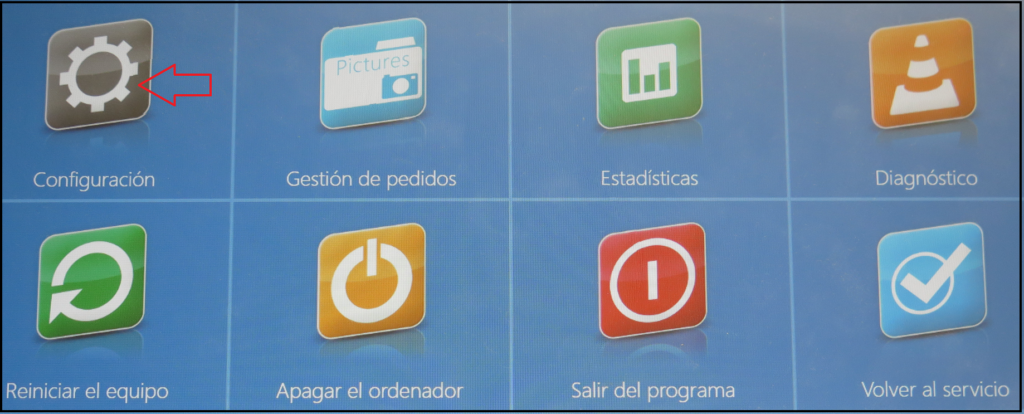
5. Now, “Printer parameters”
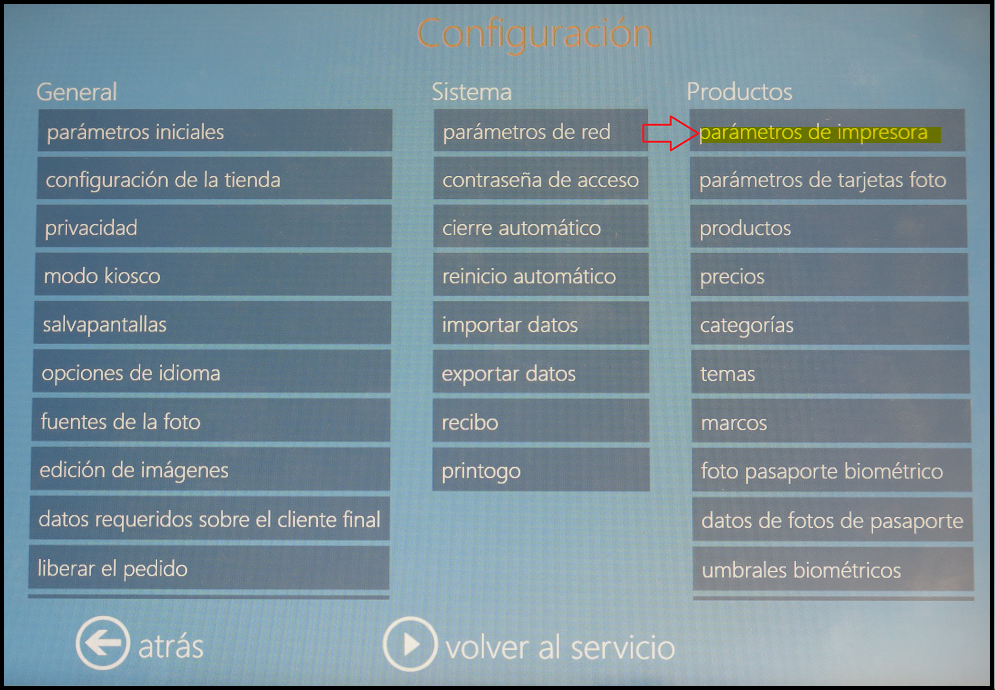
6. Select where it says “Custom colour profile DS620”
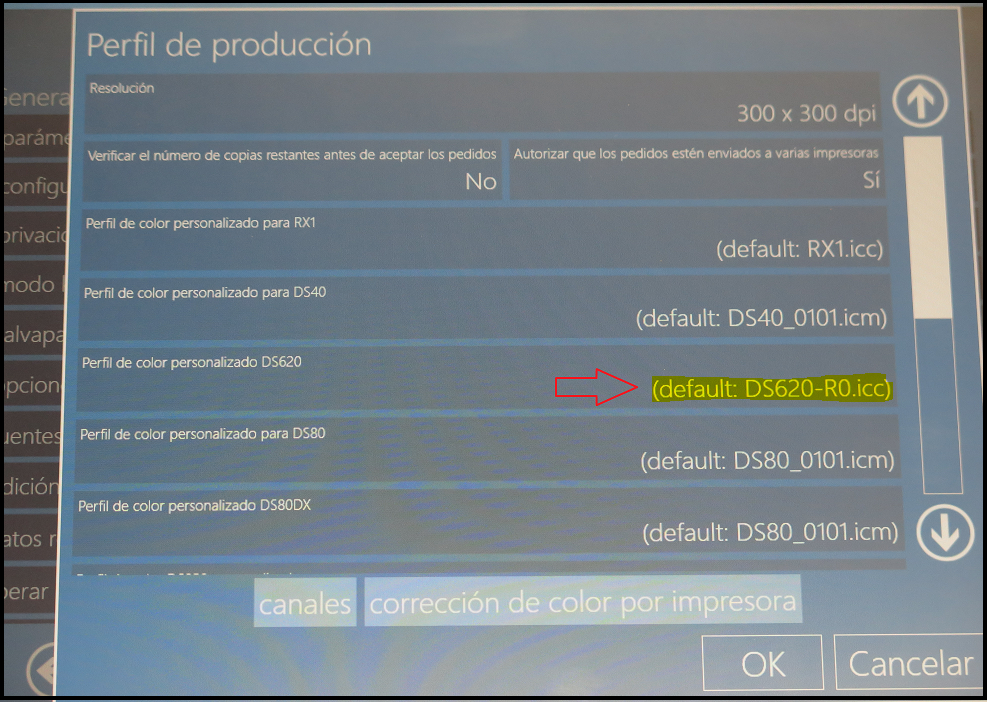
7. Select the profile we saved on the USB stick that is connected to the kiosk.
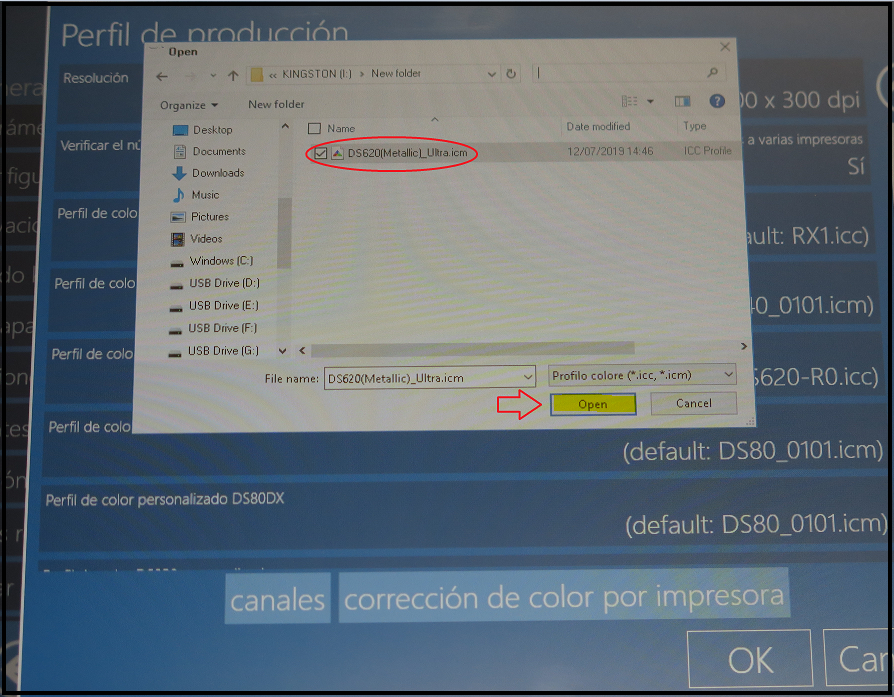
8. Check that the Metallic profile is now loaded, press OK and Return to service to print with the DNP Metallic consumable.
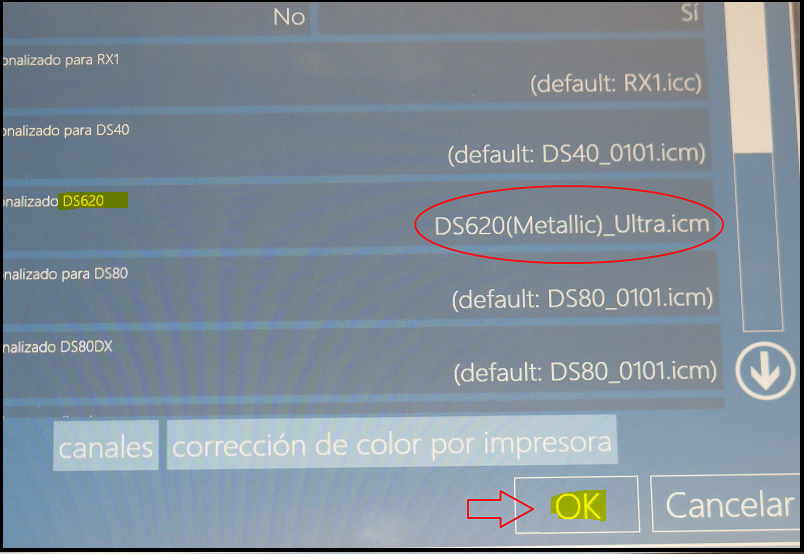
9. IMPORTANT: Once you load your usual consumable again, we must set everything back as it was. If you have never loaded a profile, we will leave it at the default (default), which we explain below; but if you had a custom profile set, remember to keep it to hand so you can set it again following the steps we have just explained.
10. To remove the metallic profile and return to the default one, follow the same steps I have explained and, when you reach step 7, on the profile selection screen, tap the “Custom profile DS620” option ➜ the window to select a profile will appear, but this time do not select anything and press “Cancel”. The following message will then appear, where you will need to press “YES”:
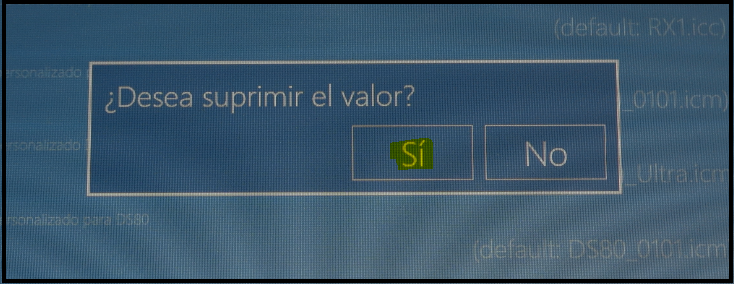
The default profile will now appear

_________________________________________________________________
APPLYING THE DNP METALLIC COLOUR PROFILE WITH WINDOWS
DOWNLOADING AND INSTALLING THE PROFILE
- Download the DNP profile for the LX Metallic consumable ➜ DS620_Metallic_Ultra
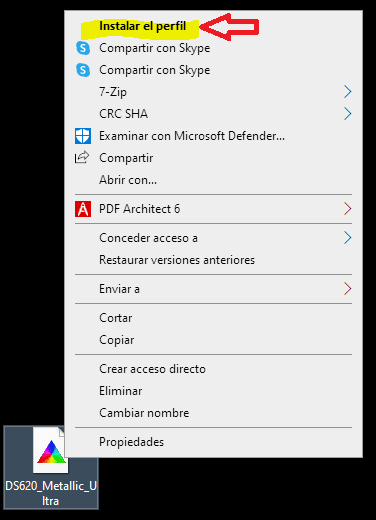
- Locate the file where you saved it, then “Install the Profile”. If you don’t know how, follow these steps:
With the mouse pointer, hover over the file ➜ right-click ➜ select “Install profile”
Note: once done, no further message appears and it seems as if nothing has happened, but the profile will now be available for use by Windows and by all the software you are using on the computer, e.g. Photoshop
PRINTING WITH WINDOWS USING A SPECIFIC PROFILE
1. Now we are going to go through the printing process, and during it we will switch profile to use this new specific profile.
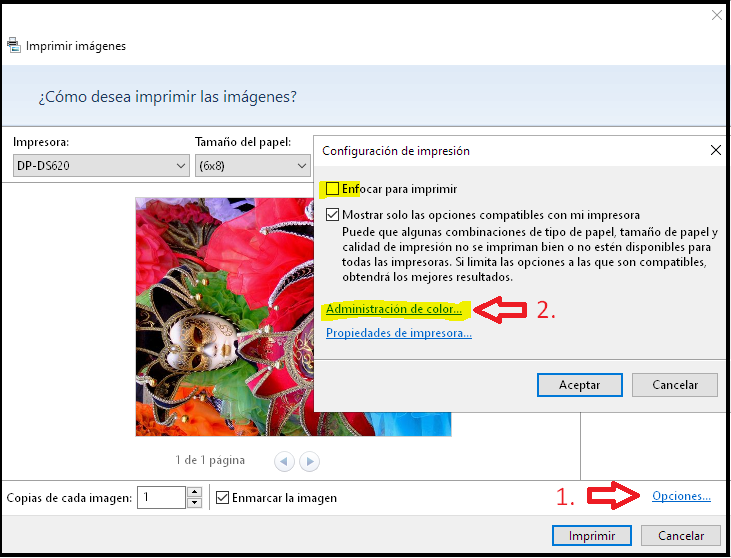
As always, we select the images to print ➜ right-click ➜ Print ➜ we select the DS620 printer and the print size, and then choose “Options” and “Colour Management”:
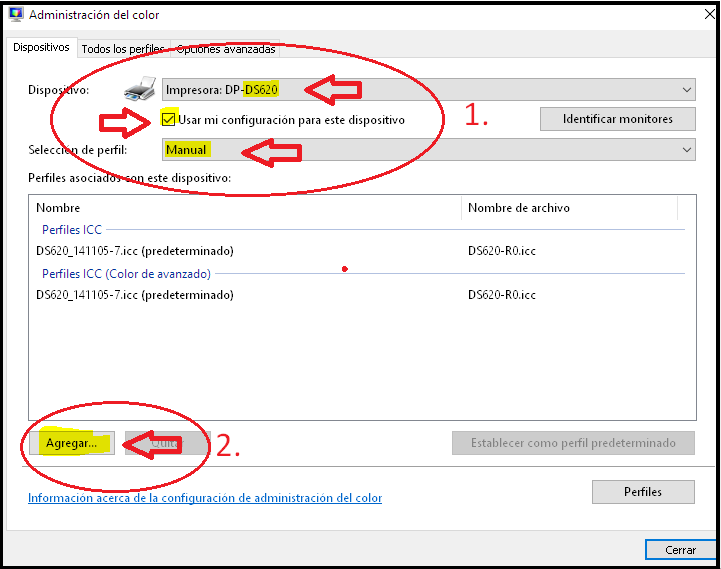
2. Once in the Windows Colour Management settings, select the values shown in the image and then click “Add”:
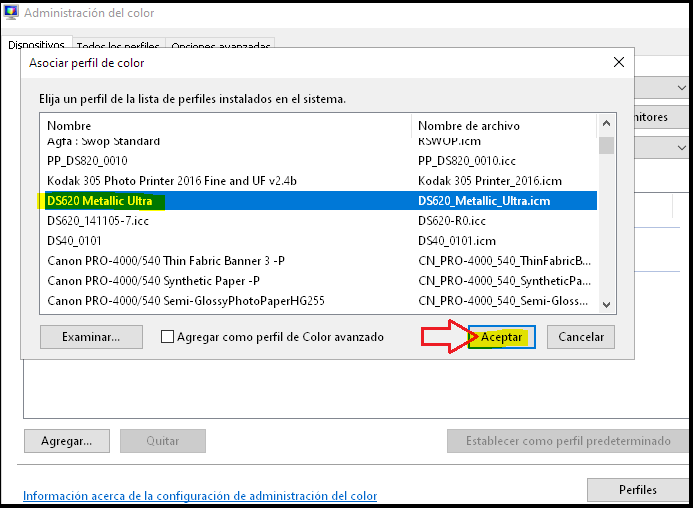
3. Find and select the profile ➜ OK:
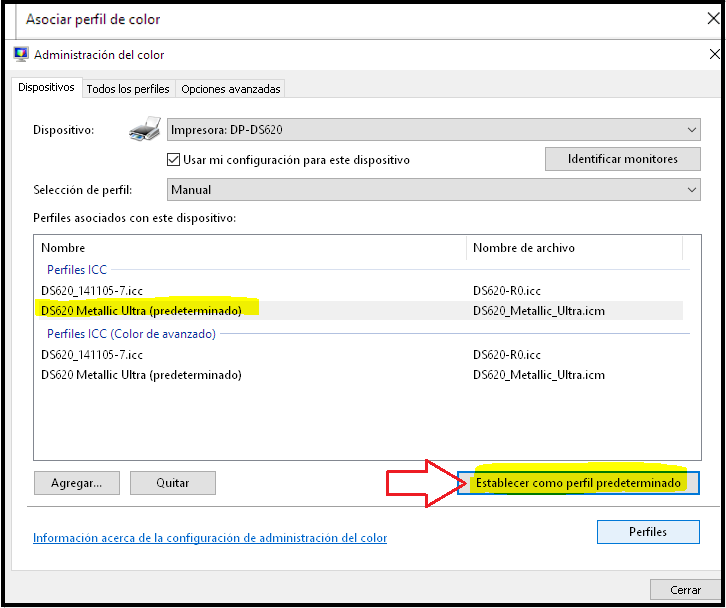
4. Select the Metallic Ultra profile and click “Set as default profile” ➜ Close
5. The colour manager for printing will now be using this new configuration. All that remains is to select print to see the results:
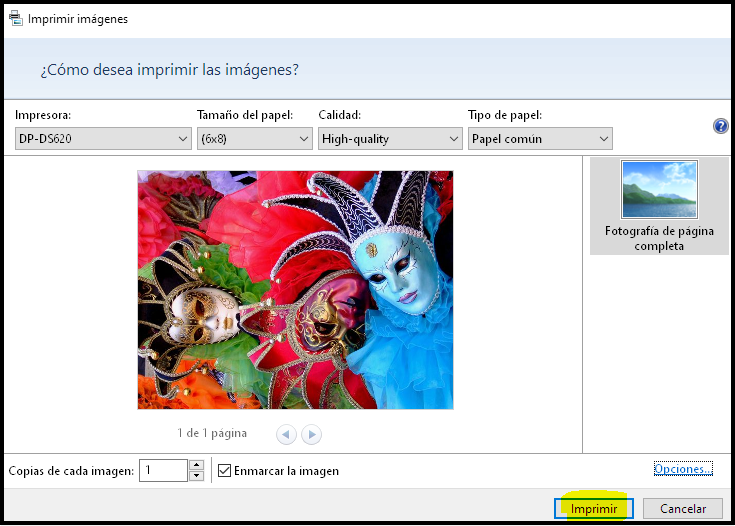
Note: You will now have this configuration for printing the DNP Metallic consumable with your DNP DS620, so when you switch back to the normal DNP paper, you must restore the configuration you had before this change.
________________________________________________________________
MANAGING THE PAPER OF THE METALLIC CONSUMABLE: LOADING WITHOUT INITIAL CUTS
We need to bear in mind that every time we load a paper roll into the DNP DS620 printer, it makes 5 paper cuts. This is not important unless it is done intensively: if we keep adding load after load of the same roll because it is a special paper, we will undoubtedly run out of paper before the ribbon.
Note: Remember that what determines the number of copies in a box of consumable is not the paper roll but the ribbon, which is what is actually counted for the copies stated on the box.
To avoid running out of paper too soon, we can load the paper without the 5 initial cuts, and this is what I will explain next. When doing this, we must bear in mind that the printer will not be discarding the part of the paper we have touched with our fingers while loading. The recommendation is really to do it wearing gloves, but if you find that “complicated”, this paper does not mark excessively, although it depends on your hands (grease, sweat or dirt left when touching the paper), so if you don’t want to leave marks, use dry, clean hands! I have done it on several occasions and have had no marks, but I cannot guarantee it, as it depends on the skin of each person’s hands and the ambient dust or particles.
How to load the DS620 printer so it does not make the 5 initial cuts:
- Open the printer drawer and load the consumable as normal, inserting the paper until it makes the double load beep (as always), but do NOT close the paper drawer.
- Without closing the printer drawer, locate the button on the left side of the paper drawer, as you can see in the image, and keep it pressed for approximately 3 seconds until it beeps.
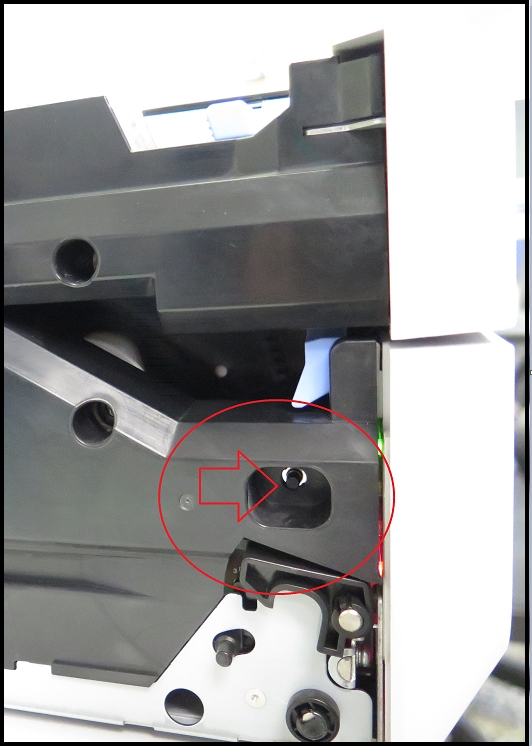
You can now close the drawer, and you will see that the printer switches to a green LED and is ready to print without having made the 5 paper cuts.
_____________________________________________________________
That’s everything, and it’s no small thing…
If this post has helped you get to know the product or learn something about how to use it, please leave a comment, however brief. It is a good way to support the continuation of this type of blog post on professional printing. Thank you.
See you next time!